La déshydratation des fruits est une méthode ancienne, mais toujours très appréciée pour conserver les fruits tout en préservant leur goût et leurs nutriments.
Que ce soit pour une collation saine, pour agrémenter vos céréales du matin, ou pour préparer des recettes de desserts, les fruits déshydratés sont une option versatile et délicieuse.
Dans cet article, nous allons explorer les différentes méthodes pour déshydrater des fruits chez vous, de manière simple et efficace.
Voici les trois principales méthodes que nous allons détailler :
- Utilisation d’un four traditionnel : Une méthode courante et accessible à tous.
- Sécher les fruits au soleil : Une technique naturelle et économique.
- Utilisation d’un déshydrateur alimentaire : Pour des résultats professionnels à domicile.
Chacune de ces méthodes a ses propres avantages et particularités, que nous allons découvrir ensemble.
- Déshydrater des fruits avec un four traditionnel
- Déshydrater des fruits de façon naturelle grâce au soleil
- Utiliser un déshydrateur pour obtenir des fruits secs
- Quels sont les fruits que l’on peut déshydrater ?
- Comment savoir si les fruits sont bien déshydratés ?
- Idées originales pour les petits et les grands après avoir déshydraté vos fruits
- Pourquoi éviter de sécher des fruits au Micro-ondes ?
- Appliquer les mêmes techniques pour déshydrater les légumes ?
- Conclusion
Déshydrater des fruits avec un four traditionnel
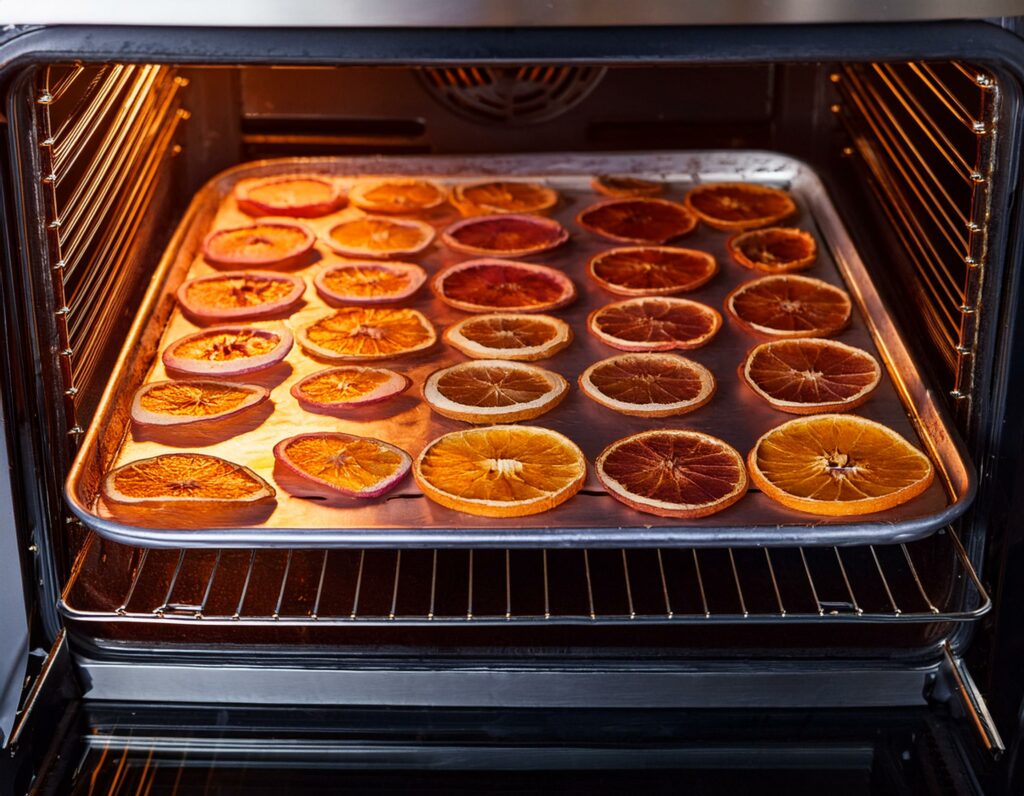
Déshydrater des fruits avec un four traditionnel est une méthode simple et efficace, accessible à la plupart des foyers. Cela permet de conserver les fruits pour une longue durée tout en gardant leur saveur et leurs nutriments intacts.
Étape 1 : Préparation des fruits
- Choisissez des fruits mûrs et frais : Les fruits doivent être bien mûrs pour avoir une saveur optimale après la déshydratation.
- Lavez les fruits soigneusement : Utilisez de l’eau propre pour éliminer toute saleté ou résidu de pesticides.
- Coupez les fruits en tranches uniformes : Des tranches de 0,5 à 1 cm d’épaisseur permettent une déshydratation uniforme. Vous pouvez utiliser une mandoline pour obtenir des tranches régulières.
- Optionnel : Trempez les fruits dans du jus de citron : Cela empêche le brunissement et préserve la couleur des fruits.
Étape 2 : Préparation du four
- Préchauffez votre four à basse température : Réglez le four entre 50°C et 60°C (120°F à 140°F). Une température plus élevée risque de cuire les fruits au lieu de les déshydrater.
- Préparez les grilles du four : Placez du papier sulfurisé sur les grilles pour éviter que les fruits ne collent. Vous pouvez également utiliser des tapis de cuisson en silicone.
Étape 3 : Disposition des fruits
- Disposez les tranches de fruits en une seule couche : Assurez-vous qu’elles ne se touchent pas pour permettre une circulation d’air optimale.
- Laissez la porte du four légèrement ouverte : Cela permet à l’humidité de s’échapper, accélérant ainsi le processus de déshydratation. Utilisez une cuillère en bois pour maintenir la porte entrouverte.
Étape 4 : Séchage des fruits
- Surveillez régulièrement le processus : Selon le type de fruit et l’épaisseur des tranches, la déshydratation peut prendre entre 4 et 12 heures.
- Retournez les tranches de fruits : Toutes les 2 à 3 heures, retournez les tranches pour assurer un séchage uniforme.
- Vérifiez la texture : Les fruits doivent être secs mais encore légèrement flexibles. Ils ne doivent pas être croustillants ou cassants.
Étape 5 : Conservation des fruits déshydratés
- Laissez les fruits refroidir complètement : Avant de les ranger, assurez-vous qu’ils sont à température ambiante pour éviter la condensation.
- Stockez les fruits dans des contenants hermétiques : Utilisez des bocaux en verre ou des sacs de congélation avec fermeture zip pour conserver les fruits. Rangez-les dans un endroit frais et sombre.
- Vérifiez régulièrement : Assurez-vous qu’il n’y a pas de signes de moisissure ou d’humidité. Les fruits déshydratés correctement peuvent se conserver pendant plusieurs mois.
Déshydrater des fruits avec un four traditionnel est une méthode pratique qui permet de profiter de fruits sains et savoureux toute l’année.
Essayez cette méthode avec différents types de fruits pour découvrir vos combinaisons préférées.
Déshydrater des fruits de façon naturelle grâce au soleil
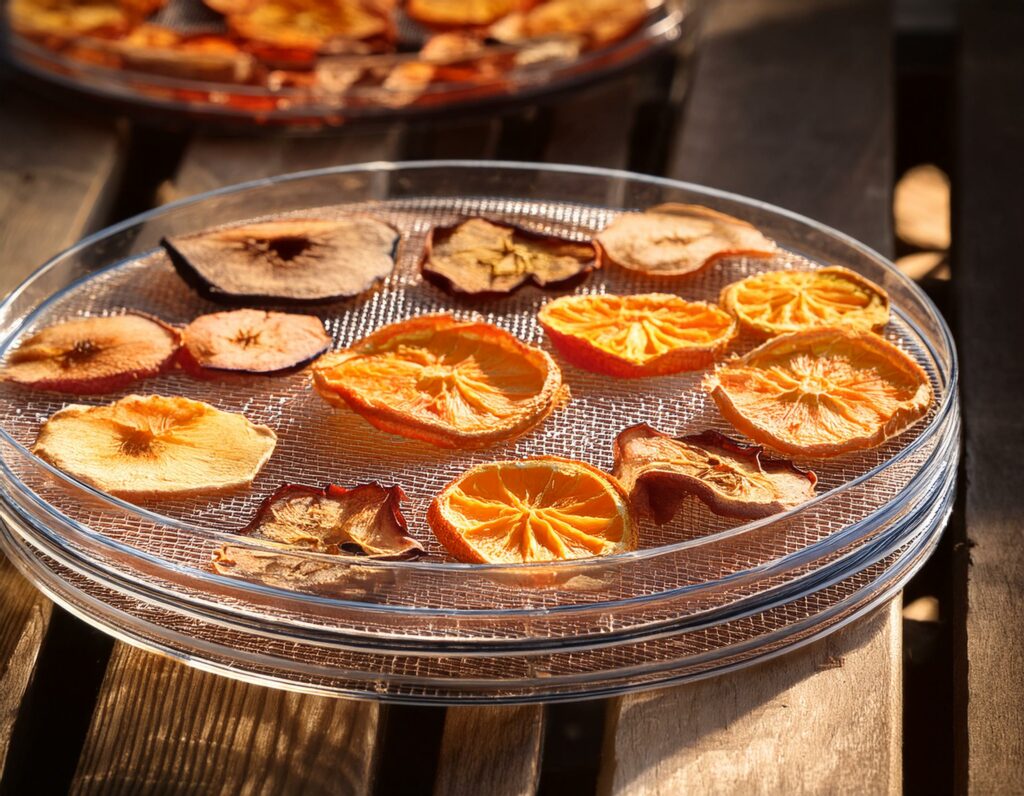
La déshydratation des fruits grâce au soleil est une méthode ancestrale, écologique et économique.
Elle permet de conserver les fruits sans avoir besoin d’équipement spécialisé, tout en utilisant l’énergie naturelle du soleil.
Étape 1 : Préparation des fruits
- Choisissez des fruits frais et mûrs : Les fruits doivent être parfaitement mûrs pour offrir une saveur optimale après la déshydratation.
- Lavez soigneusement les fruits : Nettoyez-les à l’eau claire pour éliminer toute saleté et les résidus de pesticides éventuels.
- Coupez les fruits en tranches ou en morceaux uniformes : Une épaisseur de 0,5 à 1 cm est idéale pour permettre un séchage uniforme. Les fruits plus petits, comme les baies, peuvent être laissés entiers.
Étape 2 : Préparation de l’espace de séchage
- Choisissez un emplacement ensoleillé : Trouvez un endroit qui reçoit une exposition directe au soleil pendant la majeure partie de la journée, comme une terrasse, un balcon ou un jardin.
- Préparez des plateaux de séchage : Utilisez des plateaux en filet ou des grilles pour permettre une bonne circulation de l’air. Les plateaux doivent être surélevés pour que l’air circule librement autour des fruits. Vous pouvez utiliser des briques ou des supports pour surélever les plateaux.
- Protégez les fruits des insectes : Utilisez des filets ou des tissus fins pour couvrir les fruits et les protéger des insectes tout en permettant le passage de l’air et du soleil.
Étape 3 : Disposition des fruits
- Disposez les tranches de fruits en une seule couche : Les tranches doivent être espacées pour éviter qu’elles ne se touchent et permettre une déshydratation uniforme.
- Tournez les fruits régulièrement : Retournez les fruits toutes les quelques heures pour assurer un séchage homogène de chaque côté.
Étape 4 : Séchage au soleil
- Surveillez le temps et la température : Le séchage solaire nécessite des journées chaudes et ensoleillées, avec des températures idéales entre 30°C et 40°C (86°F à 104°F).
- Rentrez les fruits la nuit : Pour éviter l’humidité de la rosée nocturne, rentrez les plateaux de fruits à l’intérieur chaque soir et sortez-les de nouveau le matin.
- Temps de séchage : Selon le type de fruit et l’épaisseur des tranches, le séchage solaire peut prendre de 2 à 4 jours.
Étape 5 : Vérification et conservation des fruits déshydratés
- Vérifiez la texture des fruits : Les fruits doivent être secs mais encore légèrement souples et élastiques. Ils ne doivent pas être croustillants ni cassants.
- Laissez les fruits refroidir : Avant de les ranger, assurez-vous qu’ils sont complètement refroidis pour éviter la condensation.
- Stockez les fruits dans des contenants hermétiques : Placez les fruits déshydratés dans des bocaux en verre, des sacs en plastique avec fermeture zip ou des contenants en métal. Conservez-les dans un endroit frais, sombre et sec.
- Vérifiez régulièrement : Inspectez les fruits de temps en temps pour détecter d’éventuels signes de moisissure ou d’humidité.
La déshydratation solaire est une méthode naturelle et écologique qui permet de profiter des saveurs estivales tout au long de l’année.
C’est également une excellente activité à réaliser en famille ou entre amis, tout en profitant des beaux jours.
Utiliser un déshydrateur pour obtenir des fruits secs
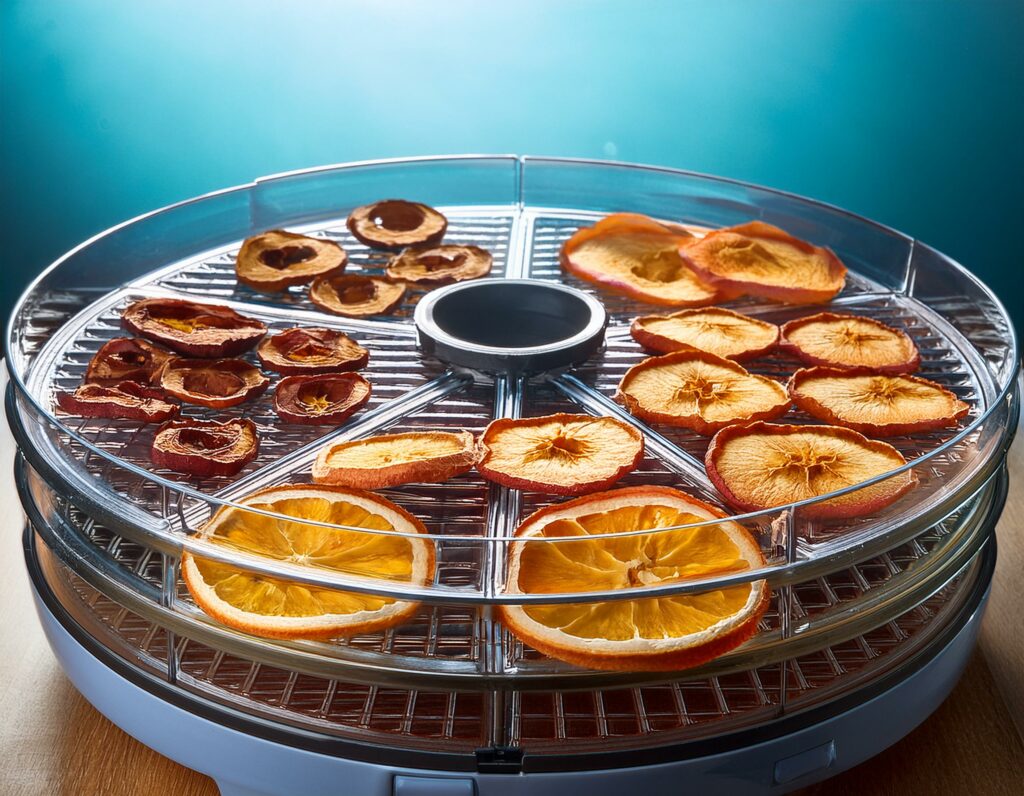
L’utilisation d’un déshydrateur alimentaire est une méthode moderne et efficace pour déshydrater des fruits.
Cet appareil spécialisé permet de contrôler précisément la température et le temps de séchage, garantissant des résultats uniformes et de haute qualité.
Étape 1 : Préparation des fruits
- Choisissez des fruits mûrs et de qualité : Utilisez des fruits frais et parfaitement mûrs pour obtenir une meilleure saveur et texture après déshydratation.
- Lavez et épluchez les fruits si nécessaire : Nettoyez les fruits à l’eau claire. Épluchez-les si la peau est épaisse ou désagréable à manger une fois sèche (comme les pommes ou les mangues).
- Coupez les fruits en tranches ou en morceaux uniformes : Les tranches doivent avoir une épaisseur d’environ 0,5 à 1 cm. Une épaisseur uniforme assure un séchage homogène.
- Optionnel : Pré-traitement pour préserver la couleur : Trempez les tranches de fruits dans du jus de citron ou une solution d’acide ascorbique pour éviter le brunissement.
Étape 2 : Préparation du déshydrateur
- Lisez le manuel d’utilisation : Familiarisez-vous avec les instructions spécifiques de votre modèle de déshydrateur.
- Disposez les fruits sur les plateaux : Étalez les tranches de fruits en une seule couche sur les plateaux du déshydrateur. Assurez-vous qu’elles ne se chevauchent pas pour permettre une bonne circulation de l’air.
- Réglez la température : La plupart des fruits se déshydratent bien à une température de 57°C (135°F). Certains fruits délicats peuvent nécessiter une température légèrement inférieure.
Étape 3 : Séchage des fruits
- Démarrez le déshydrateur : Allumez l’appareil et laissez-le fonctionner pendant la durée nécessaire. Le temps de séchage peut varier de 6 à 24 heures en fonction du type de fruit, de l’épaisseur des tranches et de l’humidité initiale des fruits.
- Surveillez régulièrement : Vérifiez l’état des fruits toutes les quelques heures pour s’assurer qu’ils sèchent uniformément. Vous pouvez intervertir les plateaux de haut en bas pour assurer un séchage homogène.
- Vérifiez la texture : Les fruits doivent être secs mais encore légèrement souples et flexibles. Ils ne doivent pas être collants au toucher.
Étape 4 : Finition et conservation des fruits déshydratés
- Laissez les fruits refroidir : Une fois le séchage terminé, laissez les fruits refroidir complètement à température ambiante avant de les ranger.
- Conditionnement : Placez les fruits déshydratés dans des contenants hermétiques comme des bocaux en verre, des sacs de congélation avec fermeture zip ou des boîtes en métal.
- Stockage : Conservez les contenants dans un endroit frais, sec et sombre. Les fruits déshydratés correctement se conservent pendant plusieurs mois.
- Vérification régulière : Inspectez les fruits de temps en temps pour détecter tout signe de moisissure ou d’humidité. Si un contenant montre des signes de condensation, les fruits doivent être séchés davantage.
Conseils supplémentaires
- Variété des fruits : Essayez de déshydrater différents types de fruits comme les pommes, les poires, les mangues, les fraises et les ananas pour varier les plaisirs.
- Assaisonnement : Pour ajouter une touche de saveur, vous pouvez saupoudrer les tranches de fruits de cannelle, de sucre ou de sel avant de les déshydrater.
- Conservation sous vide : Pour une conservation optimale, utilisez un appareil de mise sous vide pour retirer l’air des contenants et prolonger la durée de conservation des fruits déshydratés.
L’utilisation d’un déshydrateur alimentaire est une méthode pratique et fiable pour obtenir des fruits secs délicieux et nutritifs.
Quels sont les fruits que l’on peut déshydrater ?
Déshydrater des fruits est une excellente façon de prolonger leur durée de vie et de conserver leurs saveurs pour une utilisation future.
Presque tous les fruits peuvent être déshydratés, mais certains se prêtent mieux à ce processus que d’autres.
Voici une liste détaillée des fruits qui se déshydratent bien, avec quelques conseils pour chacun :
- Pommes : Trempez les tranches dans du jus de citron pour éviter le brunissement.
- Bananes : Les rondelles de banane peuvent être trempées dans du jus de citron pour préserver leur couleur.
- Fraises : Les fraises séchées peuvent être utilisées dans les céréales, les yaourts ou comme collation.
- Abricots : Les abricots secs sont excellents seuls ou dans des mélanges de fruits secs.
- Mangues : Les tranches de mangue séchée sont délicieuses et sucrées, idéales comme snack.
- Ananas : Les ananas séchés ont une saveur concentrée et sont parfaits pour grignoter.
- Poires : Les tranches de poire séchées sont sucrées et savoureuses, parfaites pour les desserts.
- Pêches : Les pêches séchées peuvent être ajoutées aux compotes ou mangées telles quelles.
- Raisins : Les raisins secs sont parfaits pour les collations, les salades ou la pâtisserie.
- Prunces : Les prunes séchées, ou pruneaux, sont riches en fibres et excellentes pour la digestion.
- Baies : Les baies déshydratées, contenant de la vitamine B17, comme les myrtilles ou les framboises, sont parfaites pour les céréales et les granolas.
- Kiwis : Les rondelles de kiwi séchées sont acidulées et très agréables à grignoter.
- Melons : Les tranches de melon séchées sont sucrées et délicieuses, idéales pour les collations.
Chaque fruit a ses particularités en termes de préparation et de temps de séchage, mais avec un peu de pratique, vous pourrez déshydrater vos fruits préférés facilement et efficacement.
Profitez de cette méthode pour créer pique niques sains, des collations saines, des ingrédients pour vos recettes et des réserves de fruits pour les saisons où ils ne sont pas disponibles.
Comment savoir si les fruits sont bien déshydratés ?
Savoir si les fruits sont bien déshydratés est essentiel pour garantir leur conservation et leur qualité.
Un fruit correctement déshydraté doit avoir perdu suffisamment d’eau pour prévenir la croissance de moisissures et de bactéries, tout en conservant une texture et une saveur agréables.
Vérification visuelle
Les fruits déshydratés doivent avoir un aspect légèrement froissé ou ridé. La couleur peut être plus foncée que celle des fruits frais en raison de la concentration des sucres.
Certains fruits, comme les pommes et les poires, peuvent devenir légèrement translucides lorsqu’ils sont bien déshydratés.
Vérification tactile
Les fruits doivent être secs au toucher, sans zones humides ou collantes. Ils doivent être souples et pliables, mais pas cassants (sauf pour les fruits très fins comme les chips de banane).
Pliez une tranche de fruit. Si elle se plie facilement sans se casser, c’est un bon signe qu’elle est bien déshydratée. Les fruits trop secs peuvent se casser ou s’émietter.
Vérification du poids
Un fruit correctement déshydraté doit avoir perdu environ 75-90% de son poids initial, selon le type de fruit. Peser les fruits avant et après le séchage peut vous donner une indication précise du niveau de déshydratation.
Vérification par la dégustation
Les fruits déshydratés doivent avoir un goût concentré et sucré, sans aucune amertume ou acidité excessive, signe d’une fermentation ou d’une déshydratation incomplète.
Ils doivent être agréables à mâcher, sans donner l’impression de manger des morceaux de caoutchouc ou de plastique.
Méthode de la jarre
Placez une petite quantité de fruits déshydratés dans un bocal hermétique pendant quelques jours.
Si de la condensation apparaît à l’intérieur du bocal, cela signifie que les fruits ne sont pas suffisamment déshydratés et doivent être séchés davantage.
Et si après quelques jours il n’y a pas de condensation et les fruits restent secs, ils sont bien déshydratés.
Vérification de la conservation
Les fruits bien déshydratés doivent pouvoir être conservés pendant plusieurs mois dans des conditions appropriées (contenants hermétiques, endroit frais et sombre).
Si des signes de moisissure ou de fermentation apparaissent rapidement, cela indique que les fruits n’ont pas été correctement séchés.
Conseils pour garantir une bonne déshydratation
- Homogénéité des tranches : Coupez les fruits en tranches de taille uniforme pour assurer un séchage homogène.
- Surveillance régulière : Vérifiez régulièrement l’état des fruits pendant le processus de déshydratation pour ajuster le temps ou la température si nécessaire.
- Rotation des plateaux : Dans un déshydrateur, intervertissez les plateaux pour garantir un séchage uniforme.
En suivant ces étapes et en utilisant ces méthodes de vérification, vous pouvez être sûr que vos fruits sont bien déshydratés et prêts à être conservés.
Idées originales pour les petits et les grands après avoir déshydraté vos fruits
Les fruits déshydratés sont non seulement délicieux et nutritifs, mais ils peuvent aussi être utilisés de manière créative pour satisfaire les papilles des petits et des grands.
Voici quelques idées originales pour profiter pleinement de vos fruits déshydratés :
Collations saines et savoureuses
- Barres de céréales maison : Incorporez des morceaux de fruits déshydratés comme les abricots, les raisins secs et les cranberries dans vos barres de céréales maison. Elles ajoutent une touche sucrée naturelle et une texture agréable.
- Mélanges de fruits secs et de noix : Mélangez différents fruits déshydratés avec des noix, des graines et des morceaux de chocolat noir pour créer des mélanges énergétiques parfaits pour les collations.
- Chips de fruits : Transformez les fruits déshydratés en chips croquantes en les coupant en tranches très fines avant la déshydratation. Les chips de banane, de pomme ou de kiwi sont particulièrement populaires.
Petit-déjeuner et desserts
- Granola maison : Ajoutez des morceaux de fruits déshydratés à votre granola maison. Les pommes, les fraises et les mangues déshydratées apportent une saveur sucrée et une texture croquante.
- Yaourt ou fromage blanc aux fruits : Mélangez des fruits déshydratés avec du yaourt ou du fromage blanc pour un petit-déjeuner rapide et nutritif. Les fruits réhydratés dans le yaourt apportent une saveur intense.
- Smoothies et milkshakes : Réhydratez des fruits déshydratés en les trempant dans de l’eau ou du jus, puis mixez-les avec du lait, du yaourt ou des boissons végétales pour créer des smoothies et des milkshakes savoureux.
Cuisiner avec des fruits déshydratés
- Salades gourmandes : Ajoutez des morceaux de fruits déshydratés, comme des cranberries, des raisins secs ou des abricots, à vos salades pour une touche sucrée et une texture intéressante.
- Sauces et chutneys : Utilisez des fruits déshydratés pour préparer des sauces et des chutneys. Les fruits comme les mangues et les abricots peuvent être réhydratés et cuits avec des épices pour créer des condiments délicieux.
- Plats mijotés : Intégrez des fruits déshydratés dans des plats mijotés pour ajouter une dimension de saveur. Par exemple, des pruneaux dans un tajine ou des raisins secs dans un curry.
Pâtisseries et confiseries
- Biscuits et muffins : Incorporez des fruits déshydratés dans vos recettes de biscuits, muffins et gâteaux. Les fruits apportent de la douceur et de la couleur.
- Pain aux fruits : Ajoutez des morceaux de fruits déshydratés à la pâte de pain pour créer des pains aux fruits délicieux, parfaits pour le petit-déjeuner ou le goûter.
- Bonbons maison : Enrobez des morceaux de fruits déshydratés dans du chocolat fondu pour créer des confiseries maison irrésistibles. Les fraises et les oranges déshydratées sont particulièrement délicieuses enrobées de chocolat.
Activités pour les enfants
- Bijoux de fruits déshydratés : Utilisez des tranches de fruits déshydratés pour créer des colliers ou des bracelets comestibles avec les enfants. Ils peuvent enfiler les fruits sur des fils alimentaires pour créer des bijoux amusants et savoureux. C’est une astuce ludique, similaire aux méthodes pour faire manger des légumes aux enfants.
- Bricolages comestibles : Incorporez des fruits déshydratés dans des activités de bricolage. Par exemple, utilisez des morceaux de fruits pour décorer des biscuits ou des cupcakes.
- Jeux de dégustation : Organisez des jeux de dégustation à l’aveugle avec différents fruits déshydratés pour apprendre aux enfants à reconnaître les saveurs et les textures.
Cadeaux gourmands
- Sachets de fruits secs : Préparez des sachets assortis de fruits déshydratés à offrir en cadeau. Emballez-les joliment et ajoutez une étiquette avec des suggestions d’utilisation.
- Confitures et gelées : Utilisez des fruits déshydratés pour faire des confitures et des gelées maison. Ils apportent une concentration de saveurs uniques.
- Paniers gourmands : Créez des paniers gourmands en ajoutant des fruits déshydratés à d’autres produits faits maison, comme des biscuits, des chocolats et des noix.
Que ce soit pour des collations, des repas, des activités créatives ou des cadeaux, les fruits déshydratés offrent une multitude de possibilités pour régaler les petits et les grands.
Pourquoi éviter de sécher des fruits au Micro-ondes ?
Bien que le micro-ondes soit un appareil pratique pour chauffer et cuire rapidement des aliments, il n’est généralement pas recommandé pour déshydrater des fruits.
Inégalité du séchage
Les micro-ondes chauffent les aliments de manière inégale, ce qui peut entraîner un séchage non uniforme des fruits. Certaines parties peuvent devenir trop sèches ou brûlées, tandis que d’autres restent humides.
Pour tenter de compenser cette inégalité, il faudrait constamment tourner et réarranger les fruits, ce qui est peu pratique et inefficace.
Risque de brûlure
Le micro-ondes chauffe les aliments très rapidement, ce qui peut facilement brûler les fruits, surtout s’ils sont coupés en tranches fines. Les fruits peuvent carboniser avant même d’être correctement déshydratés.
Contrairement à un déshydrateur ou un four, il est difficile de contrôler précisément la température dans un micro-ondes. Une chaleur excessive peut endommager les fruits et altérer leur saveur.
Perte de nutriments
La chaleur intense et rapide du micro-ondes peut dégrader certains nutriments sensibles présents dans les fruits, tels que les vitamines C et A. Les méthodes de séchage plus lentes et à basse température préservent mieux les nutriments.
Les antioxydants présents dans les fruits peuvent également être affectés par les températures élevées du micro-ondes, réduisant ainsi les bienfaits nutritionnels des fruits déshydratés.
Texture et qualité
Les fruits séchés au micro-ondes peuvent avoir une texture caoutchouteuse ou trop dure, en raison de la déshydratation rapide et inégale.
Le séchage au micro-ondes peut altérer la saveur des fruits, rendant certains fruits amers ou moins savoureux que lorsqu’ils sont déshydratés lentement.
Appliquer les mêmes techniques pour déshydrater les légumes ?
La déshydratation des légumes utilise des techniques similaires à celles des fruits, avec quelques ajustements spécifiques.
Points similaires avec les fruits
- Préparation : Comme pour les fruits, il est essentiel de choisir des légumes frais et de qualité. Lavez-les soigneusement, épluchez-les si nécessaire, et coupez-les en morceaux ou tranches uniformes pour un séchage homogène.
- Utilisation du déshydrateur : Réglez le déshydrateur à une température entre 50°C et 60°C. Disposez les légumes en une seule couche sur les plateaux, sans qu’ils se touchent. Les temps de séchage varient entre 6 et 12 heures, selon l’épaisseur et la teneur en eau.
- Utilisation du four : Préchauffez le four à basse température (50-60°C). Placez les légumes en une seule couche sur des plaques de cuisson recouvertes de papier sulfurisé et laissez la porte légèrement ouverte pour permettre l’évacuation de l’humidité. Le séchage prend généralement entre 6 et 18 heures.
- Séchage au soleil : Pour les régions chaudes, le séchage au soleil est aussi une option. Placez les légumes sur des plateaux en filet ou des grilles, couvrez-les de filets pour les protéger des insectes, et laissez-les sécher plusieurs jours au soleil.
- Vérification et conservation : Les légumes doivent être secs et cassants, sans zones humides. Laissez-les refroidir complètement avant de les ranger dans des contenants hermétiques, et conservez-les dans un endroit frais, sec et sombre.
Points différents avec les fruits
- Blanchiment : Contrairement aux fruits, certains légumes bénéficient d’un blanchiment préalable. Plongez-les brièvement dans de l’eau bouillante, puis dans de l’eau glacée. Cela aide à préserver la couleur, la texture et les nutriments.
- Temps de séchage : Les légumes, notamment ceux à forte teneur en eau comme les courgettes et les tomates, peuvent nécessiter un temps de séchage plus long que les fruits. Par exemple, les carottes et les poivrons prennent environ 8 à 12 heures, tandis que les tomates peuvent nécessiter jusqu’à 18 heures ou plus.
- Texture finale : Les légumes séchés sont généralement plus cassants que les fruits. Par exemple, les chips de carottes et de betteraves sont souvent très croquantes, tandis que les fruits conservent une certaine flexibilité.
- Utilisation en cuisine : Les légumes déshydratés sont souvent réhydratés avant utilisation dans les plats cuisinés, comme les soupes et les ragoûts, alors que les fruits déshydratés sont souvent consommés tels quels comme snacks ou utilisés dans les pâtisseries sans réhydratation.
- Stockage : Certains légumes déshydratés, comme les oignons et les herbes, ont une durée de conservation plus longue que la plupart des fruits déshydratés et peuvent être utilisés comme condiments ou épices dans divers plats.
Conclusion
La déshydratation des fruits et légumes est une méthode efficace pour prolonger leur durée de vie tout en conservant leurs saveurs et nutriments.
Que vous utilisiez un four traditionnel, le soleil ou un déshydrateur, chaque méthode offre ses propres avantages.
Une large gamme de fruits, comme les pommes, les bananes et les fraises, se prête bien à la déshydratation, tout comme de nombreux légumes après quelques ajustements comme le blanchiment.
Ces techniques permettent de créer des collations saines, des ingrédients pratiques pour la cuisine et des cadeaux gourmands.
En maîtrisant ces méthodes, vous pouvez profiter des bienfaits des produits frais tout au long de l’année, tout en explorant une variété de saveurs et de textures.
Profitez de ces conseils pour déshydrater efficacement vos fruits et légumes et enrichir votre alimentation de manière savoureuse et nutritive.